Had a bit of a nightmare with my laptop in February and so wasn't able to update my blog. I really missed being able to join in challenges so I'm glad it seems to be working again now...shhhh don't say it too loudly!
I joined the lovely Fiona's team at Create and Inspire last month, and our sponsor was Oddball Art Stamps Co - the wonderfully talented Lizzy Love's designs. I used the fabulous Big Eye Girl Dancing Huni 174. I decided to keep to black and white with shades of grey for this, as I had some fab hearts and love themed designer papers I wanted to use with it.
I ripped and distressed the edges of the designer paper with the blade of a pair of scissors then used Distress Ink to edge it so it stood out from the white card stock. The image was coloured with Polychromos pencils in black and greys, with white as a blending colour. The wording came with the image, and I printed it out and cut round it in a heart shape and edged with black ink.
The second project for February was for A Inky Mess with the sponsor Scrap N Dipity. I used the image Fairy Ambrosia - Looking for Love. I coloured her in using my Polychromos pencils, then fussy cut her out. I embossed a piece of black card stock and cut it to ATC size, then I got various designer papers with the theme of love and ripped and distressed the edges of them, before sticking onto the black card.. I stuck the image on top, and added a couple of flat backed pearls.
I'm so glad to be well enough to be able to get back to what I love doing - creating projects both for myself, family and friends as well as for the lovely design teams I'm in.
Two of my passions - cats and cards in one place. I adore creating cards, but also mixed media, pocket letters as well as other crafts and love meeting other like-minded crafters in the blogging community, and enter challenges online. I'm blessed to be part of four design teams that showcase wonderful work from their sponsors, and I love getting inspiration from You Tube and Pinterest, as well as seeing the talented works of those that enter the challenges on the challenge blogs I'm a DT member.
Friday, 10 March 2017
Create and Inspire sponsored by Starzstamps
I'm so happy to be back in blogland! Its been far too long! Long story short, its been, and still is, a rocky road health wise, but I'm hoping that now the days are drawing out it won't be long til Spring and warmer weather. My body doesn't cope with cold!
I'm pleased to announce I joined the DT over at Create and Inspire in February. I'm so happy to be part of the talented team and looking forward to creating different types of projects in the coming months. I'll share last month's challenge inspiration project on my next post - my laptop was playing up last month so I couldn't blog.
This months challenge is sponsored by StarStampz.. We chose two digi stamps and 'm using this cutey, called Spring Sun Shine. I used my Promarkers to colour her in, keeping to predominantly green and pink as this was the colour scheme of the bag and embellishments I wanted to use.
I used a die cut ivory piece of card and overlaid it with a pale green gingham piece of paper from my stash. I added a die cut piece of felt on top that again, I had been gifted and had in my stash. I fussy cut the image and stuck it to the front, after I had attached the flowers, and I tucked the image behind one so it was grounded with the background. I added the tag and butterflies as the finishing touches.
Here's a close up of the image.
Thanks for stopping by! Please do comment and let me know what you think.
I would like to enter this project into the following challenges:
Michelle xxx
I'm pleased to announce I joined the DT over at Create and Inspire in February. I'm so happy to be part of the talented team and looking forward to creating different types of projects in the coming months. I'll share last month's challenge inspiration project on my next post - my laptop was playing up last month so I couldn't blog.
This months challenge is sponsored by StarStampz.. We chose two digi stamps and 'm using this cutey, called Spring Sun Shine. I used my Promarkers to colour her in, keeping to predominantly green and pink as this was the colour scheme of the bag and embellishments I wanted to use.
I used a die cut ivory piece of card and overlaid it with a pale green gingham piece of paper from my stash. I added a die cut piece of felt on top that again, I had been gifted and had in my stash. I fussy cut the image and stuck it to the front, after I had attached the flowers, and I tucked the image behind one so it was grounded with the background. I added the tag and butterflies as the finishing touches.
Here's a close up of the image.
I would like to enter this project into the following challenges:
Michelle xxx
Sunday, 20 November 2016
SheepSki Designs November Challenge
Hi again - yes I'm back again so soon!!
I started out with a thick MDF plain wood heart base and glued some cogs and bones from Things to Alter around the perimeter of the front with Ranger Matt Medium. I then covered the front and back with a thin layer of Matt Medium and affixed normal aluminium kitchen foil all over, pressing around the cogs with a spatula to get it in the crevices. Once dry, I covered with acrylic paint in Walnut Brown, then in Black. I used Liquitex Heavy Gesso and Tim Holtz Crackle Glaze stencil and added the effect in the middle of the heart. Once dry, I added gold crackle paint around the outer edge area and onto the cogs and bones. I then added pink blush gilding wax and gold ink to the crackle glaze area and on the raised cogs and bones to further accentuate them.
Here's a close up of the image and crackle glazed area.
The image was coloured with Polychromos pencils in reds, pinks, greys and black and I used Ranger Distress Crayons in grey around the perimeter of the image plus a touch of Wink of Stella on the lighter areas of the roses, the teeth and top of the skull, then roughed up the edges of the image with scissors then added some gold ink and dark brown distress crayon with my finger to the edges before affixing to the heart with Matt Medium.
As a final touch, I threaded a red ribbon through the hole and affixed a Tim Holtz buckle with a brad to the ribbon and created a buckled loop for hanging.
I hope you enjoy my latest project.
I will be entering this project into the following challenges:
World Wide Open Design Team Challenge - #16 AG
Daisy Chain Challenges - #2 All That Glitters
Your Scrapbook Place - Fall for November Challenge
Dream in Darkness - November Grumbacher's here
Dark n Daring Challenges - #7 Anything Goes
Crafty Friends - #45 Blossoms
Thanks for stopping by.
Michelle xxx
Design Team Special Discount
Use code SKIMICHELLE10 at checkout at SheepSki Design Etsy Shop for 10% off any order.
This time I'm here with my November DT inspiration for this month's challenge over at SheepSki Design Facebook page. I chose Skully Roses for my image and decided to attempt to create something dark and metallic looking from things that are more wood or paper based.
I started out with a thick MDF plain wood heart base and glued some cogs and bones from Things to Alter around the perimeter of the front with Ranger Matt Medium. I then covered the front and back with a thin layer of Matt Medium and affixed normal aluminium kitchen foil all over, pressing around the cogs with a spatula to get it in the crevices. Once dry, I covered with acrylic paint in Walnut Brown, then in Black. I used Liquitex Heavy Gesso and Tim Holtz Crackle Glaze stencil and added the effect in the middle of the heart. Once dry, I added gold crackle paint around the outer edge area and onto the cogs and bones. I then added pink blush gilding wax and gold ink to the crackle glaze area and on the raised cogs and bones to further accentuate them.
Here's a close up of the image and crackle glazed area.
The image was coloured with Polychromos pencils in reds, pinks, greys and black and I used Ranger Distress Crayons in grey around the perimeter of the image plus a touch of Wink of Stella on the lighter areas of the roses, the teeth and top of the skull, then roughed up the edges of the image with scissors then added some gold ink and dark brown distress crayon with my finger to the edges before affixing to the heart with Matt Medium.
As a final touch, I threaded a red ribbon through the hole and affixed a Tim Holtz buckle with a brad to the ribbon and created a buckled loop for hanging.
I hope you enjoy my latest project.
I will be entering this project into the following challenges:
World Wide Open Design Team Challenge - #16 AG
Daisy Chain Challenges - #2 All That Glitters
Your Scrapbook Place - Fall for November Challenge
Dream in Darkness - November Grumbacher's here
Dark n Daring Challenges - #7 Anything Goes
Crafty Friends - #45 Blossoms
Thanks for stopping by.
Michelle xxx
Friday, 18 November 2016
Markers! Papers! Digis! 12 Days of Christmas - SheepSki
I'm finally feeling in the Christmassy mood and really enjoying seeing lovely Christmas projects on Facebook and YouTube.
SheepSki Designs is sponsoring day 18 of 12 Days of Christmas over at Markers! Papers! Digis! on Facebook and there's plenty to entertain today. This morning a game was launched to choose your favourite Christmas digi stamp from SheepSki, with the opportunity of winning a prize.
The Design Team at SheepSki as well as Andrea herself, have been busy creating some cards to showcase a new digi stamp called Penguin Pals. To celebrate this and the sponsorship of the 12 days event, the digital stamp is being offered at a discounted price of 96p for a limited time.
Here's my CaS style card. I just adore this digi, with the cute penguins making a snow penguin. I used an old embossing folder and stamp set called Winter Wonderland and embossed a 6x4 white card base with the folder, then coloured the digi with Polychromos pencils and fussy cut. Once glued to the base, I used Wink of Stella in clear to highlight the snow, snow penguin and the white on the hat. I then stamped the sentiment from the set in Stazon Black Soot.
I do hope you love this digi as much as I do. Don't forget you can purchase this gorgeous digi from the SheepSki etsy store at a discount for a month. Please do also go over to Markers, Papers, Digis on Facebook to see the rest of the DT inspiration and to join in the fun and games there plus share your SheepSki projects with us over at the Facebook page, where you'll find our monthly challenges.
I shall see you with my next DT project for the new months challenge that starts on Sunday 20 November.
I am entering this card into the following challenges:
Unicorn Challenges: #15 Snow/Snowflakes
World Wide Open Design Challenge - #16 AG
Your Scrapbook Place - Fall for November Challenge
Lets Craft and Create - #119 Winter
Sasayaki Glitter Challenge -Winter
Craft Rocket Challenge - #28 White on White
Crafting by Designs: Little Animals
Thanks for stopping by.
Michelle xxx
SheepSki Designs is sponsoring day 18 of 12 Days of Christmas over at Markers! Papers! Digis! on Facebook and there's plenty to entertain today. This morning a game was launched to choose your favourite Christmas digi stamp from SheepSki, with the opportunity of winning a prize.
The Design Team at SheepSki as well as Andrea herself, have been busy creating some cards to showcase a new digi stamp called Penguin Pals. To celebrate this and the sponsorship of the 12 days event, the digital stamp is being offered at a discounted price of 96p for a limited time.
Here's my CaS style card. I just adore this digi, with the cute penguins making a snow penguin. I used an old embossing folder and stamp set called Winter Wonderland and embossed a 6x4 white card base with the folder, then coloured the digi with Polychromos pencils and fussy cut. Once glued to the base, I used Wink of Stella in clear to highlight the snow, snow penguin and the white on the hat. I then stamped the sentiment from the set in Stazon Black Soot.
I do hope you love this digi as much as I do. Don't forget you can purchase this gorgeous digi from the SheepSki etsy store at a discount for a month. Please do also go over to Markers, Papers, Digis on Facebook to see the rest of the DT inspiration and to join in the fun and games there plus share your SheepSki projects with us over at the Facebook page, where you'll find our monthly challenges.
I shall see you with my next DT project for the new months challenge that starts on Sunday 20 November.
I am entering this card into the following challenges:
Unicorn Challenges: #15 Snow/Snowflakes
World Wide Open Design Challenge - #16 AG
Your Scrapbook Place - Fall for November Challenge
Lets Craft and Create - #119 Winter
Sasayaki Glitter Challenge -Winter
Craft Rocket Challenge - #28 White on White
Crafting by Designs: Little Animals
Thanks for stopping by.
Michelle xxx
Tuesday, 25 October 2016
A Inky Mess #5 and 31DOH Day 25
This month is flying by isn't it! The nights are definitely drawing in now too, seems it's darker much earlier now. And with only just under a week until the clocks go back - it will soon be even earlier!
Today I'm sharing a gorgeous Ikes Art design for Challenge #5 over at A Inky Mess. The background paper is called Poe Paper and the image is Vaguely Goth. Both can be found over at Ike's Art website where all her images can be purchased.
This is a page in my art journal - I've not done much in it of late and this image was crying out for me to do a page. I started out with the Poe Papers png which I printed out on purple card stock. I ripped and distressed the edges then edged with Stazon in Soot Black. I found another piece of paper stock from Tim Holtz Idea-Ology paper stack that coordinated with the purple, and ripped this and edged the same. I glued them onto the page, and then with black acrylic paint, I painted round and onto the papers. I used a mini rounds stencil from The Crafters Workshop and texture paste for the grungy effect. Once dry I went over the textured areas with Cosmic Shimmer gilding wax in blush to add some shine and colour.
The Vaguely Goth image was coloured using Promarkers, then I added definition in the hair, eyes, lips and neck studs with my Polychromos pencils. I fussy cut her out and glued her to the page. Using my Dymo label maker I typed an EAP quote and stuck it onto the page and outlined with my FC Pitt pen in Black.
I am entering this into the following challenges:
I hope you enjoyed this project, please do leave a comment as this means a lot to me.
Thanks for stopping by
Michelle xxx
Today I'm sharing a gorgeous Ikes Art design for Challenge #5 over at A Inky Mess. The background paper is called Poe Paper and the image is Vaguely Goth. Both can be found over at Ike's Art website where all her images can be purchased.
This is a page in my art journal - I've not done much in it of late and this image was crying out for me to do a page. I started out with the Poe Papers png which I printed out on purple card stock. I ripped and distressed the edges then edged with Stazon in Soot Black. I found another piece of paper stock from Tim Holtz Idea-Ology paper stack that coordinated with the purple, and ripped this and edged the same. I glued them onto the page, and then with black acrylic paint, I painted round and onto the papers. I used a mini rounds stencil from The Crafters Workshop and texture paste for the grungy effect. Once dry I went over the textured areas with Cosmic Shimmer gilding wax in blush to add some shine and colour.
The Vaguely Goth image was coloured using Promarkers, then I added definition in the hair, eyes, lips and neck studs with my Polychromos pencils. I fussy cut her out and glued her to the page. Using my Dymo label maker I typed an EAP quote and stuck it onto the page and outlined with my FC Pitt pen in Black.
I am entering this into the following challenges:
I hope you enjoyed this project, please do leave a comment as this means a lot to me.
Thanks for stopping by
Michelle xxx
Monday, 24 October 2016
SheepSki Design Challenge and 31DOH Day 24
Just under a week left before the spookiest night of the year...wooooooooo.
It's been a strange month for me - I'd had huge plans for the month that didn't really take off - including being able to do every day for 31 Days of Halloween. But I won't dwell on the negative, but think ahead for next year and go for it again. All's not lost. I've enjoyed looking at the others who joined in the blog hop and you can find all the entrants on the left hand side of my blog.
I'm so excited to be part of a talented digital designer's design team. I've used Andrea's designs whilst working for other design teams, so when I was chosen to be part of her team I was overjoyed. She does her challenge blog on Facebook. So this is my first project for SheepSki Designs Digital Stamps and I've used Claire Bear. If you wish to purchase Claire Bear or any other SheepSki digital stamp, you can get 10% off your purchase when you use the promo code: SKIMICHELLE10 - simply go to the shop and put the code in the promo box before checkout.
Thanks for stopping by, don't forget to comment to show some love.
Michelle xxx
It's been a strange month for me - I'd had huge plans for the month that didn't really take off - including being able to do every day for 31 Days of Halloween. But I won't dwell on the negative, but think ahead for next year and go for it again. All's not lost. I've enjoyed looking at the others who joined in the blog hop and you can find all the entrants on the left hand side of my blog.
I'm so excited to be part of a talented digital designer's design team. I've used Andrea's designs whilst working for other design teams, so when I was chosen to be part of her team I was overjoyed. She does her challenge blog on Facebook. So this is my first project for SheepSki Designs Digital Stamps and I've used Claire Bear. If you wish to purchase Claire Bear or any other SheepSki digital stamp, you can get 10% off your purchase when you use the promo code: SKIMICHELLE10 - simply go to the shop and put the code in the promo box before checkout.
I used some coloured card stock from my stash in purple and green and cut the purplle to fit on the base card with a border showing round. I cut the green card stock in half and on the first half I embossed haunted house onto it (it's behind Claire Bear) and on the other I embossed a diamond/harlequin design. These were cut to size to fit with a border purple showing. I found a piece of ribbon similar in colour to the purple card and stuck it vertically where the join of both green pieces of card was. I coloured Claire Bear with my Promarkers and then went over with my Polychromos pencils to accentuate areas. I used a sentiment from Kenny K I had bought last month, and cut it out using a die from my stash. I stuck it down over the ribbon. I had some cool harlequin diamond washi tape in my stash so used that top and bottom of the green card. Finally I cut Claire Bear out and stuck her on the left piece of card.
I do hope you come join us over at Sheepski Designs Digital Stamps Challenge
I am entering this card into the following challenges:
Thanks for stopping by, don't forget to comment to show some love.
Michelle xxx
Tuesday, 18 October 2016
Fantasy Crafters Challenge #4 and 31DOH Day 18
It's almost upon us!! This time of year is my favourie time - the colours of the leaves changing and that crisp feel to the air, hot chocolate and warm jumpers and of course - Halloween and Bonfire Night! Of course, my body disagrees with me but I tend to try to ignore its protests as I gleefully look forward to all things spooky and dark.
There's been a gap between my last 31DOH make and this one, due to health issues, but here's one I made for a DT inspiration, and there will be more to follow so do pop by on the blog hop.
Hannah Lynn has brought out some fabulous digital stamps just for the occasion and we at Fantasy Crafters DT had the honour of choosing from her newest spooky creations - aren't we lucky!! I chose Batty Over You. If you look ever so closely you'll see a cute little face peeking out - a tiny bat she's holding.
I used my Polychromos pencils to colour the main image in, blending with the white pencil. I wanted to add more to the scene, so chose a freebie image from Sheepski Designs called Hallow Hall and coloured that in with mostly blacks and greys, and added some warm candle glow to the windows and open door for suitable effect. I found a piece of A5 Gorjuss Girls paper that was the perfect colour so cut the cute girlie off for use another time and used the remainder as my paper background. I fussy cut both the house/moon and the girl out and glued them on top of the paper. I needed something else... I found a cute cobweb die cut leftover from last year's stash, and printed off a suitable sentiment from a digi set I bought from Kenny K stamps. I edged the wording after cutting round it roughly, with Stazon ink in Soot Black to take away some of the starkness.
Think it came out pretty cute! What do you think? Hope you like it too.
I will be entering this card into the following:
Crafty Calendar Challenge - Halloween
Lets Craft & Create - #118 Halloween
Sasayaki Glitter - Halloween
Left of Centre - #152 Halloween
Simply Create Too - #120 Halloween
Crafts & Me - World Card Making Day
Dream In Darkness - October
Thanks for stopping by! Do post a comment to show some love.
Michelle xx
There's been a gap between my last 31DOH make and this one, due to health issues, but here's one I made for a DT inspiration, and there will be more to follow so do pop by on the blog hop.
Hannah Lynn has brought out some fabulous digital stamps just for the occasion and we at Fantasy Crafters DT had the honour of choosing from her newest spooky creations - aren't we lucky!! I chose Batty Over You. If you look ever so closely you'll see a cute little face peeking out - a tiny bat she's holding.
I used my Polychromos pencils to colour the main image in, blending with the white pencil. I wanted to add more to the scene, so chose a freebie image from Sheepski Designs called Hallow Hall and coloured that in with mostly blacks and greys, and added some warm candle glow to the windows and open door for suitable effect. I found a piece of A5 Gorjuss Girls paper that was the perfect colour so cut the cute girlie off for use another time and used the remainder as my paper background. I fussy cut both the house/moon and the girl out and glued them on top of the paper. I needed something else... I found a cute cobweb die cut leftover from last year's stash, and printed off a suitable sentiment from a digi set I bought from Kenny K stamps. I edged the wording after cutting round it roughly, with Stazon ink in Soot Black to take away some of the starkness.
Think it came out pretty cute! What do you think? Hope you like it too.
I will be entering this card into the following:
Crafty Calendar Challenge - Halloween
Lets Craft & Create - #118 Halloween
Sasayaki Glitter - Halloween
Left of Centre - #152 Halloween
Simply Create Too - #120 Halloween
Crafts & Me - World Card Making Day
Dream In Darkness - October
Thanks for stopping by! Do post a comment to show some love.
Michelle xx
Ike'sworld Challenges #74 Girl Power
Hi again!
It's been a while - in fact, it's been far too long, since I last picked up a pen/pencil or papers and glue and I've missed it so much, and have to admit to feeling completely sorry for myself.
But in light of what month it is and indeed, what we are focusing on for this month's challenge at Ike'sworld Challenges, I am very grateful for what health I do have still.
I printed the digital stamp onto Copics marker paper and used my Promarkers to colour her, then went over her hair and face with my Polychromos pencils to add definition. She was fussy cut ready to add to the card once I'd finished layering it up. I used papers from my Wild Rose Studio Vintage Rose paper pack, and used a spellbinder die to cut the two pieces of paper out. These were glued to a pink 6x6 card. I added a pink doily in the middle and placed my fussy cut Think Pink image in the middle. I added Botanica minis in Pink from Petaloo to the bottom of the image and I cut the sentiment from the die set Just a Note to Say by Frantic Stamper.
I'm so excited to be part of Ike's team and would love to see what you make for this month's challenge. Please go to week 1 to download the free image if you wish to use it for this or any other project, but do enter for a chance to win £15 worth of digital stamps from Ike's shop, or a cherished Top 3 badge if you're chosen by the Design Team as one of their favourite entries for the month. Just choose a stamp or digi that features a woman and it would be lovely if the colour pink featured somewhere, but that's optional.
I will be entering this card into the following:
The Corrosive Challenge Blog - #10 Pink for Awareness
Allsorts Challenge Blog - Week 385 Pink October
Unicorn Challenge Blog - #14 Pretty Pinks
Dragonfly Dreams - October Think Pink
World Wide Open DT Challenge - #15 AG
Daisy Chain Challenges - #1 Pink for Breast Cancer Awareness
Creative Craft Cottage - #73 Pink for Breast Cancer Awareness
Your Scrapbook Place - AG - Ikes Art Image
Thanks for stopping by - don't forget to leave me some love by way of a comment, I love to hear from you.
Michelle xxx
It's been a while - in fact, it's been far too long, since I last picked up a pen/pencil or papers and glue and I've missed it so much, and have to admit to feeling completely sorry for myself.
But in light of what month it is and indeed, what we are focusing on for this month's challenge at Ike'sworld Challenges, I am very grateful for what health I do have still.
This month is Think Pink, specifically 16th October and we have a special theme
Girl Power.
For my Design Team inspirational project I chose the lovely freebie everyone who is a follower of the challenge can download and use (not just for this challenge, and indeed, you don't have to use it to enter). She's such a strong image I just had to use her. She's called Think Pink.I printed the digital stamp onto Copics marker paper and used my Promarkers to colour her, then went over her hair and face with my Polychromos pencils to add definition. She was fussy cut ready to add to the card once I'd finished layering it up. I used papers from my Wild Rose Studio Vintage Rose paper pack, and used a spellbinder die to cut the two pieces of paper out. These were glued to a pink 6x6 card. I added a pink doily in the middle and placed my fussy cut Think Pink image in the middle. I added Botanica minis in Pink from Petaloo to the bottom of the image and I cut the sentiment from the die set Just a Note to Say by Frantic Stamper.
I'm so excited to be part of Ike's team and would love to see what you make for this month's challenge. Please go to week 1 to download the free image if you wish to use it for this or any other project, but do enter for a chance to win £15 worth of digital stamps from Ike's shop, or a cherished Top 3 badge if you're chosen by the Design Team as one of their favourite entries for the month. Just choose a stamp or digi that features a woman and it would be lovely if the colour pink featured somewhere, but that's optional.
I will be entering this card into the following:
The Corrosive Challenge Blog - #10 Pink for Awareness
Allsorts Challenge Blog - Week 385 Pink October
Unicorn Challenge Blog - #14 Pretty Pinks
Dragonfly Dreams - October Think Pink
World Wide Open DT Challenge - #15 AG
Daisy Chain Challenges - #1 Pink for Breast Cancer Awareness
Creative Craft Cottage - #73 Pink for Breast Cancer Awareness
Your Scrapbook Place - AG - Ikes Art Image
Thanks for stopping by - don't forget to leave me some love by way of a comment, I love to hear from you.
Michelle xxx
Tuesday, 4 October 2016
Ike'sworld Design Team
It's a happy happy day - not only is the sun shining and I managed to get 5 hours sleep (that's a lot for me), I found out last night I'd been offered a place on Ike'sworld's design team.
Thank you so much Ike for this opportunity and I'm looking forward to my first project as part of the DT.
My first DT project will be on the blog on 18th October, but remember, there's a challenge every fortnight on Ike'sworld Challenge Blog so do pop on over to take a look at all the lovely creations by the entire team.
Thanks for stopping by.
Michelle xxx
Thank you so much Ike for this opportunity and I'm looking forward to my first project as part of the DT.
My first DT project will be on the blog on 18th October, but remember, there's a challenge every fortnight on Ike'sworld Challenge Blog so do pop on over to take a look at all the lovely creations by the entire team.
Thanks for stopping by.
Michelle xxx
Sunday, 2 October 2016
31DOH - Day 2 and Challenge #4 at A Inky Mess
Here's my DT inspiration piece of the latest challenge over at A Inky Mess.
This month's challenge #4 is sponsored by Oddball Art Co by Lizzy Love and I've used Jasmyn No. 67.
This is also my Day 2 project for 31 Days of Halloween. You will find the blog hop with links over to your left in the side bar to visit the other participating members.
So here's my make. I used a 6"x6" base card in orange, and layered a piece of fussy cut wallpaper on to it, and using a Distress Crayon in Dark Grey I added some grunge around the edge. I used Distress Ink in Old Paper with my finger to add some patina to the wallpaper image.
I coloured Jasmyn in with my Polychromos pencils -using orange, black and greys to coordinate with the base card and the background and then fussy cut her and her cute bats out before affixing to the background. Here's a close up of her.
Please do pop by to A Inky Mess and join in with Challenge #4 - it's anything goes as long as mixed media. And don't forget to pop over to the other blogs that are in the 31DOH blog hop.
I shall see you tomorrow with my next make!
I have entered this into the following challenges:
World Wide Open DT Challenge #14 - AG
Michelle xx
This month's challenge #4 is sponsored by Oddball Art Co by Lizzy Love and I've used Jasmyn No. 67.
This is also my Day 2 project for 31 Days of Halloween. You will find the blog hop with links over to your left in the side bar to visit the other participating members.
So here's my make. I used a 6"x6" base card in orange, and layered a piece of fussy cut wallpaper on to it, and using a Distress Crayon in Dark Grey I added some grunge around the edge. I used Distress Ink in Old Paper with my finger to add some patina to the wallpaper image.
I coloured Jasmyn in with my Polychromos pencils -using orange, black and greys to coordinate with the base card and the background and then fussy cut her and her cute bats out before affixing to the background. Here's a close up of her.
Please do pop by to A Inky Mess and join in with Challenge #4 - it's anything goes as long as mixed media. And don't forget to pop over to the other blogs that are in the 31DOH blog hop.
I shall see you tomorrow with my next make!
I have entered this into the following challenges:
World Wide Open DT Challenge #14 - AG
Michelle xx
31DOH - Day 1 (ok ok I'm late hehe)
Well hellooooo - yep, it's that time of year again...the nights draw in and the crisp Autumn air fills our lungs,, the smell of bonfires, acorns and falling leaves. I adore this time of year, and being of the more ancient traditional bent, I have always celebrated Samhain (or Halloween if you like). So when I found out about the 8th 31 Days of Halloween, I really couldn't pass up the chance to join in. Now you may be wondeering where I was last year - well I'm a relative newbie to the world of blogland and it's the first year I'd heard about it. I'm so excited to be a part of this fab festivity!
So without further ado - my first project for 1st October is a pocket letter I made using some of my favourite papers for the spooky season. I couldn't resist adding some embellishments including Mr Batty and some pops of orange. A friend gave me some super cute die cuts of the witches washing line - it's so adorable and the die is on my wish list.
I've made litereally dozens of pocket letters and it's given me immense joy over the past oooh almost 2 years to swap with so many creative and talented people. I don't do as many as I used to though, but still love creating ATCs - more on this a bit later.
My second post for 2nd day will be up a little later (when I've finished the project - come back later please!!!).
Thanks for stopping by.
Michelle xxx
So without further ado - my first project for 1st October is a pocket letter I made using some of my favourite papers for the spooky season. I couldn't resist adding some embellishments including Mr Batty and some pops of orange. A friend gave me some super cute die cuts of the witches washing line - it's so adorable and the die is on my wish list.
I've made litereally dozens of pocket letters and it's given me immense joy over the past oooh almost 2 years to swap with so many creative and talented people. I don't do as many as I used to though, but still love creating ATCs - more on this a bit later.
My second post for 2nd day will be up a little later (when I've finished the project - come back later please!!!).
Thanks for stopping by.
Michelle xxx
Sunday, 18 September 2016
Application for Ike's Art Design Team Call
My name's Michelle and I'm a lone disabled parent to a 12yr old boy and two 2 crazy mogs. They all keep me happy and laughing, whilst creating art keeps me sane and gives me joy too. I started up papercrafting three years ago, making cards, then moved to other crafts as well like mini albums, altered art, pocket letters, ATCs, etc, and more recently I've gotten into mixed media and art journelling.
I currently work on 3 Design Teams: - A Inky Mess, Fantasy Crafters and Through the Purple Haze, and I'm a former DT member for Cute as a Button, More Mixed Media and Left of Center. I'm excited to announce I've been asked to be a guest designer for a well known digi designer on 1st October too, so watch this space!
I love working as part of Design Teams, and love the comraderie of working alongside talented artists and colorists, as well as the thrill of creating something to a theme, or using an image supplied. I love the challenge of the blank page and the satisfaction of getting messy with art supplies, and hours going by super fast whilst I work on a project, then the happy feeling when it's done and can be watermarked and uploaded ready for a challenge. I also enjoy interacting with those that enter challenges - I've gotten to know quite a few of the regulars and it's lovely seeing their new makes appear on challenges.
Here are my three most favourite pieces to date:
I adored working on this - my all time favourite so far. It won first prize over at Ike'sworld Challenges which I was overjoyed about.
This super cute clown was lovely to work with and worked well with patterned papers in the backgroud.
I love dragons, what can I say? And this particular one from Sheepski Designs really captured my heart.
I shall be keeping my fingers and toes crossed and wish everyone good luck who applies.
Here are my social media details:
Twitter: @mcollett46
YouTube: Michelle Collett / JournalKitty
Google+:Michelle Collett
Email: mcsurrey1969@yahoo.co.uk
LOC #148 Four Legged Friends
Hi again! Wow mid September - Halloween is just round the corner, I'm soo excited about it this year - more on that later.
This week over at Left of Center Challenges our theme is Four Legged Friends and our sponsor is Nikki Burnette. I chose a Vampire Fairy colouring page called Angelique which could also be reduced down to fit on a card, etc.
I used Polychromos pencils to colour her and the background in. It was lovely to colour a whole picture for a change. I chose predominantly greys to depict the light of the moon with pops of colour for the dragon and candles, plus Angelique's clothing.
This is my last DT project for Left of Center - it's been a pleasure to work with Maureen and the lovely design team and I wish them all well.
I shall be entering this into the following challenges:
Ike'sworld Challenges - #72 Things that Fly
Dark n Daring - #5 Anything Goes
Thanks for stopping by!
Michelle xxx
This week over at Left of Center Challenges our theme is Four Legged Friends and our sponsor is Nikki Burnette. I chose a Vampire Fairy colouring page called Angelique which could also be reduced down to fit on a card, etc.
I shall be entering this into the following challenges:
Ike'sworld Challenges - #72 Things that Fly
Dark n Daring - #5 Anything Goes
Thanks for stopping by!
Michelle xxx
Thursday, 15 September 2016
Challenge #3 - Fantasy Crafters
Hi again! Where's September going? It seems that our year is whizzing by far too fast. My favourite season is nearing - Autumn with the occasional Indian Summer (although seems to be a full on heatwave right now - too hot for me and my health conditions sadly), then the multi coloured leaves, and crisp air - and of course Samhain, my favourite celebration, or Halloween as it's more commonly known. More on that note on a later date though.
For this month's Anything Goes (Fantasy) challenge over at Fantasy Crafters, the DT could use whatever image we liked - a nice change from choosing from sponsors images, although I do so love to do that too, and to help those digital stamp designers get their name out there. I chose a cute cherubic fairy tending to her flowers for mine - she was an image made available to us by Vixykins, our lovely blog host.
She was coloured in initially using Promarkers, but I added definition to the flowers and her hair and some shading with my Polychromos pencils. Here's a close up of her:
I used standard square 7x7" premade card in deep pink for the base, and added a pretty rose paper from my stash and matted it with some green glitter card and stuck it to the front. I fussy cut the fairy out and stuck her to the paper, along with the alpha letters from my stash. This card is going to be a birthday card for my niece, age will be added later.
It's a relatively simple card compared to my normal work, but I like its simplicity and wanted the fairy to take the show. Hope you like it too! Do comment and let me know what you think.
I'll be entering this card into the following challenges:
World Wide Open DT Challenge Blog #14 - AG
Thanks for stopping by!
Michelle xxx
For this month's Anything Goes (Fantasy) challenge over at Fantasy Crafters, the DT could use whatever image we liked - a nice change from choosing from sponsors images, although I do so love to do that too, and to help those digital stamp designers get their name out there. I chose a cute cherubic fairy tending to her flowers for mine - she was an image made available to us by Vixykins, our lovely blog host.
She was coloured in initially using Promarkers, but I added definition to the flowers and her hair and some shading with my Polychromos pencils. Here's a close up of her:
I used standard square 7x7" premade card in deep pink for the base, and added a pretty rose paper from my stash and matted it with some green glitter card and stuck it to the front. I fussy cut the fairy out and stuck her to the paper, along with the alpha letters from my stash. This card is going to be a birthday card for my niece, age will be added later.
It's a relatively simple card compared to my normal work, but I like its simplicity and wanted the fairy to take the show. Hope you like it too! Do comment and let me know what you think.
I'll be entering this card into the following challenges:
World Wide Open DT Challenge Blog #14 - AG
Thanks for stopping by!
Michelle xxx
Tuesday, 6 September 2016
Challenge #108 - Through the Purple Haze
Hello again!
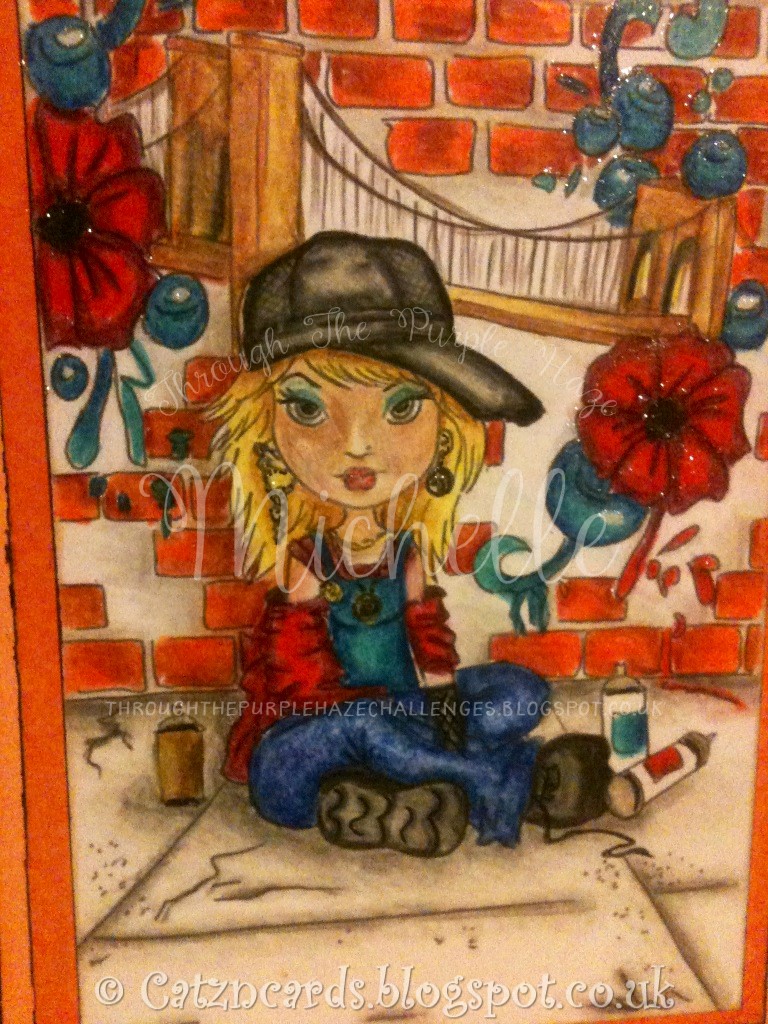
Well it's an honour to have the opportunity to work with Lisbeth and team Bubbles over at Through the Purple Haze. This is my very first DT project for the team and I enjoyed using one of Lacy Sunshine's digi stamps by Heather Valentin from her Kidz Street series - Brooklyn.
It's a colouring page but I shrunk it to fit a square card base and coloured it using my Polychromos pencils.
Once coloured and burnished, I used clear Wink of Stella on the grafitti and on Brookln's lips and jewellery.
Here's a close up - as you can see I made sure she was grounded to the background by adding shadow to the floor and the wall behind her.
I used a 6x6" card base in pale orange as well as a 6x6" piece of orange paper from the BoBunny Carnival paper pack. This was cut to size to mat behind the coloured image. The leftover piece was used later on.
I have recently purchased some Brusho crystals and was excited to use them for the first time. I decided to try getting some splots and splashes reminiscent of an aerosol can/graffiti look on a piece of cardstock left over from cutting the image out. Next time I shall use watercolour paper as think it will give a better result, but I was really thrilled to sprinkle some of the crystals onto the paper and then spray with water and watch them burst into life. I cut this piece to size once dry and then cut the leftover piece of orange paper slightly larger as a mat. I then assembled the card with matting and layering each piece. I edged both the mats and the image and brusho card with Stazon black soot. To finish the card off, I used washi tape top and bottom of the brusho piece of card, a denim tag I found in my stash, and added a Tim Holtz rub-on I'd rubbed onto a spare piece of card and trimmed, edged with orange ink and stapled to the tag. This was attached at the top under the washi by a small staple.
I hope you enjoy seeing my latest project - and don't forget to pop over to Through the Purple Haze for Challenge #108 - theme: Rock It/Show Some Attitude.
I am entering this project into the following challenges:
Ikesworld Challenges - #71 Square card with Circle
Thanks for stopping by.
Michelle xxx
Well it's an honour to have the opportunity to work with Lisbeth and team Bubbles over at Through the Purple Haze. This is my very first DT project for the team and I enjoyed using one of Lacy Sunshine's digi stamps by Heather Valentin from her Kidz Street series - Brooklyn.
It's a colouring page but I shrunk it to fit a square card base and coloured it using my Polychromos pencils.
Once coloured and burnished, I used clear Wink of Stella on the grafitti and on Brookln's lips and jewellery.
Here's a close up - as you can see I made sure she was grounded to the background by adding shadow to the floor and the wall behind her.
I used a 6x6" card base in pale orange as well as a 6x6" piece of orange paper from the BoBunny Carnival paper pack. This was cut to size to mat behind the coloured image. The leftover piece was used later on.
I have recently purchased some Brusho crystals and was excited to use them for the first time. I decided to try getting some splots and splashes reminiscent of an aerosol can/graffiti look on a piece of cardstock left over from cutting the image out. Next time I shall use watercolour paper as think it will give a better result, but I was really thrilled to sprinkle some of the crystals onto the paper and then spray with water and watch them burst into life. I cut this piece to size once dry and then cut the leftover piece of orange paper slightly larger as a mat. I then assembled the card with matting and layering each piece. I edged both the mats and the image and brusho card with Stazon black soot. To finish the card off, I used washi tape top and bottom of the brusho piece of card, a denim tag I found in my stash, and added a Tim Holtz rub-on I'd rubbed onto a spare piece of card and trimmed, edged with orange ink and stapled to the tag. This was attached at the top under the washi by a small staple.
I hope you enjoy seeing my latest project - and don't forget to pop over to Through the Purple Haze for Challenge #108 - theme: Rock It/Show Some Attitude.
I am entering this project into the following challenges:
Ikesworld Challenges - #71 Square card with Circle
Thanks for stopping by.
Michelle xxx
Labels:
blog,
brick wall,
Brooklyn,
brusho crystals,
challenge blog,
denim tag,
DT,
Graffiti,
Kidz Street,
Lacy Sunshine,
polychromos pencils.,
spray can,
Through the Purple Haze,
washi
DT Favourite at Classic DT Open Challenge
Wow I'm so happy! I have had a project chosen again by the lovely team at Classic Design Team Open Challenge as a winner, this time Kristyn's DT Favourite - thank you Kristyn!
Saturday, 3 September 2016
Top 3 - Craft Rocket Challenges #22
I made Top 3 over at Craft Rocket Challenges for challenge #22 - Things with Wings.
I entered this DT project from LOC #144.
Thank you to the team over at Craft Rocket Challenges for choosing my card for Top 3.
I entered this DT project from LOC #144.
Thank you to the team over at Craft Rocket Challenges for choosing my card for Top 3.
Top 3 Dark n Daring Challenge #4
I made Top 3 over at Dark n Daring Challenge #4 - Anything Goes.
I entered my August Fantasy Crafters DT project:
Thank you so much to the team over at Dark n Daring for choosing my card.
Michelle xxx
I entered my August Fantasy Crafters DT project:
Thank you so much to the team over at Dark n Daring for choosing my card.
Michelle xxx
Feisty Ladies over at Left of Center
Hi again folks!!
Well it's that time agaiin, my fortnightly project over at Left of Center. This week's theme for our #146 Challenge is Feisty Ladies and our sponsor this week is Oddball Art Co Stamps by Lizzy Love.
Dream in Darkness -September AG
Well it's that time agaiin, my fortnightly project over at Left of Center. This week's theme for our #146 Challenge is Feisty Ladies and our sponsor this week is Oddball Art Co Stamps by Lizzy Love.
I decided to use Creepy Cute Big Eyed Girl in Chains - DeeDee Image 265. She is indeed feisty wouldn't you agree?
I used Digi Paper Deisgns by Lozzy - The Paper Wall paper for the background, with strips of washi tape and some stickers from my stash to add some 'graffiti' aspect to it. I then printed out and coloured the big eyed girl with my Polychromos pencils and my Zest It blender. I used black and purple because it went with the look I was going for. Instead of using the chain image that comes with this gorgeous digi (it comes with a brick wall too), I used part of an old bracelet to attach her to the wall. The sentiment was also part of the digi set. I used Tim Holtz Distress Crayons in neutrals - brown and grey - to add colour and texture to the base of the wall and to add the shadow to the girl on the wall. I coloured up with Stazon black ink and used silver pen on two barbed wire corners from Things to Alter and added these to my art journal page top and bottom.
I hope you enjoy my latest make. Do come on over to Left of Center Challenge #146 - Feisty Ladies or go LOC as long as it fits the rules of our group.
I will be entering the following challenges with this art journal page:
Dream in Darkness -September AG
Thanks for stopping by.
Michelle xxx
Thursday, 25 August 2016
Morpheus by Sheepski Designs
Hello there again!
I'm honoured to work on another Sheepski Design digi stamp this week, this time it's Morpheus. He is such a cutie in his flower, I'm sure you'll agree!
I've been experimenting with different mediums this week and so for the main image I printed him out on Neenah Crest cardstock and then used my new MozArt brush pen set to lay down the first colours. Once this was dry, I used my Polychromos pencils to add dimension and shading. I then added Wink of Stella in Gold on the flower and Spectrum Noir Glitter pen in green on the stem.
The background to my art journal page comprises of two patterned digi papers from Lozzy's designs over at Paper Lozzy. These particular papers can be found on her blog under freebie papers. Once I had printed off the digi papers, I ripped them and adhered them to my page with matte medium. Once they were dry, I added Liquitex Heavy Gesso in white and Liquitex glass beads gel. This added some glimmer and dimension. Once this layer was dry, I added some visual interest with some stamps from my stash. I coloured the centres of the flowers that I printed in Stazon ink in black with my MozArt brush pens. I added some bling from my stash in the centre of the flowers.
I had the 'dream' wording in my stash and I added some Distress Crayon to the edge to distress it a little, and did the same around the page where the papers end. I fussy cut Morpheus out and stuck him down then placed the wording underneath.
I'm entering my art journal page into the following challenges:
I hope you enjoyed my latest make, thanks for stopping by!
Michelle xxxx
A list of things used in this project:
Daler and Rowney Mixed Media Journal
MozArt brush markers (pack of 12). yellow, orange, brown, and both greens.
Faber Castell Polychromos Pencils.
Ranger Matt Medium
Liquitex White Heavy Gesso
Liquitex Glass Bead Gel
small decopage scissors
Caran Dache blending pencil
Wink of Stella - Gold
Spectrum Noir glitter pen - Green
Items from my stash
I'm honoured to work on another Sheepski Design digi stamp this week, this time it's Morpheus. He is such a cutie in his flower, I'm sure you'll agree!
I've been experimenting with different mediums this week and so for the main image I printed him out on Neenah Crest cardstock and then used my new MozArt brush pen set to lay down the first colours. Once this was dry, I used my Polychromos pencils to add dimension and shading. I then added Wink of Stella in Gold on the flower and Spectrum Noir Glitter pen in green on the stem.
The background to my art journal page comprises of two patterned digi papers from Lozzy's designs over at Paper Lozzy. These particular papers can be found on her blog under freebie papers. Once I had printed off the digi papers, I ripped them and adhered them to my page with matte medium. Once they were dry, I added Liquitex Heavy Gesso in white and Liquitex glass beads gel. This added some glimmer and dimension. Once this layer was dry, I added some visual interest with some stamps from my stash. I coloured the centres of the flowers that I printed in Stazon ink in black with my MozArt brush pens. I added some bling from my stash in the centre of the flowers.
I had the 'dream' wording in my stash and I added some Distress Crayon to the edge to distress it a little, and did the same around the page where the papers end. I fussy cut Morpheus out and stuck him down then placed the wording underneath.
I'm entering my art journal page into the following challenges:
I hope you enjoyed my latest make, thanks for stopping by!
Michelle xxxx
A list of things used in this project:
Daler and Rowney Mixed Media Journal
MozArt brush markers (pack of 12). yellow, orange, brown, and both greens.
Faber Castell Polychromos Pencils.
Ranger Matt Medium
Liquitex White Heavy Gesso
Liquitex Glass Bead Gel
small decopage scissors
Caran Dache blending pencil
Wink of Stella - Gold
Spectrum Noir glitter pen - Green
Items from my stash
Subscribe to:
Posts (Atom)